Monday, March 26, 2012

Exchange edition compared

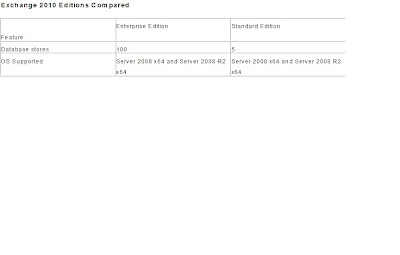
let us see the difference between exchange 2010 editions,

Exchange server 2010 Standard Edition

The main difference between two editions is that Standard edition only supports 5 database stores. This can be a major issue with medium to large companies as Microsoft recommends only 100-200GB max per data stores. This version is ideal for CAS and HUB server role for medium to large companies as Enterprise edition will not provide addition features on these server roles.

Exchange server 2010 Enterprise Edition

Enterprise version supports 100 mailbox databases compare to standard. Enterprise edition is a must have for mailbox server role in medium to large companies.


Tuesday, August 9, 2011

Escape from Expensive Licensing: RemoteApp

Nowadays, the cost involved in the user license for some applications are too high. But off course we cannot avoid this, but for an extent can be minimized smartly by using the RemoteApp. Though RemoteApp is not the first to exist, prior can be done via Citrix.

For example just think about common application used internally which has the per user license, can be published in RemoteApp, in turn used for n number of users.

But there are high end application cover this loop holes, their licensing terms have the virtualizing license terms and also blocked the feasibility of terminal session publish options. As long as the application allows as to work smoothly in RemoteApp, no harm in using it. This can save some serious money for your organization.

Thanks

Logan

Directory Partitions in Active Directory:

We will discuss on the directory partitions in active directory and its purpose served in the windows domain environment. The active directory database is logically separated into directory partitions:
Schema partition
Configuration partition
Domain partition
Application partition
Each partition is a unit of replication, and each partition has its own replication topology. Replication occurs between replicas of directory partition. Minimum two directory partitions are common among all domain controllers in the same forest: the schema and configuration partitions. All domain controllers which are in the same domain, in addition, share a common domain partition.
Schema Partition
1. Only one schema partition exists per forest.
2. The schema partition is stored on all domain controllers in a forest.
3. The schema partition contains definitions of all objects and attributes that you can create in the directory, and the rules for creating and manipulating them.
4. Schema information is replicated to all domain controllers in the attribute definitions.
Configuration Partition
1. There is only one configuration partition per forest.
2. Second on all domain controllers in a forest.
3. The configuration partition contains information about the forest-wide active directory structure including what domains and sites exist, which domain controllers exist in each forest, and which services are available.
4. Configuration information is replicated to all domain controllers in a forest.
Domain Partition
1. Many domain partitions can exist per forest.
2. Domain partitions are stored on each domain controller in a given domain.
3. A domain partition contains information about users, groups, computers and organizational units.
4. The domain partition is replicated to all domain controllers of that domain. All objects in every domain partition in a forest are stored in the global catalog with only a subset of their attribute values.
Application Partition
1. Application partitions store information about application in Active Directory.
2. Each application determines how it stores, categorizes, and uses application specific information. To prevent unnecessary replication to specific application partitions, you can designate which domain controllers in a forest host specific application partitions. Unlike a domain partitions, an application partition cannot store security principal objects, such as user accounts. In addition, the data in an application partition is not stored in the global catalog.
As an example of application partition, if you use a Domain Name System (DNS) that is integrated with Active Directory you have two application partitions for DNS zones -- ForestDNSZones and DomainDNSZones:
ForestDNSZones is part of a forest. All domain controllers and DNS servers in a forest receive a replica of this partition. A forest-wide application partition stores the forest zone data.
DomainDNSZones is unique for each domain. All domain controllers that are DNS servers in that domain receive a replica of this partition. The application partitions store the domain DNS zone in the DomainDNSZones.
Each domain has a DomainDNSZones partition, but there is only one ForestDNSZones partition. No DNS data is replicated to the global catalog server.
The below are some useful commands related to the application partitions in NTDSUTIL,

Creating and deleting application directory partitions,
#CREATE NC dc=application,dc=example,dc=com server.example.com
Or
#CREATE NC dc=application,dc=example,dc=com null
#DELETE NC dc=application,dc=example,dc=com

Creating and deleting replicas,
#ADD NC REPLICA dc=application,dc=example,dc=com server2.example.com
Or
#ADD NC REPLICA dc=application,dc=example,dc=com null
#REMOVE NC REPLICA dc=application,dc=example,dc=com server2.example.com
Or
#REMOVE NC REPLICA dc=application,dc=example,dc=com null

Defining a replication schedule,
#SET NC REPLICATE NOTIFICATION DELAY dc=application,dc=example,dc=com 10 15

Displaying replica information,
#LIST NC REPLICAS dc=application,dc=example,dc=com

Thanks
Logan


BCP vs DR

Organizations are only as good as their current system being used. This system encompasses all processes ranging from human capital down to the various aspects of operations such as production, quality assurance and even disaster preparedness. In this regard, an organization can only survive if it employs certain strategies that will make it live longer. Two of these strategies are the BCP and the DR. These two strategies or disciplines are related because both of them help the organization from being disrupted from any untoward variables either internal or external in nature.

BCP is completely known as Business Continuity Planning. The definition of such a term is really easy for the term already speaks of what it is all about ‘“ continuity of the business. It is simply the state of being ready for any unforeseen incident that can disrupt the day to day process or operation of businesses and organizations alike. Hence, it is a good management strategy wherein the organization is ensured that it can always maintain its standards and service levels even if there are some challenges that come its way.

In addition, BCP is a preventive and proactive strategy of ensuring business continuity. It therefore helps in lessening the probable damage that could have resulted if there were no safety preparations employed prior to the incident.

On the other hand, DR or Disaster Recovery is obviously recovering from a disaster. It is the strategy of intelligent recuperation from a negative incident of any magnitude. Thus, DR is simply a reactive approach. It is more of a treatment given to a disease rather than a preventive measure. Nowadays, the trend or focus for both BCP and DR is on the IT or information technology of the organization. With major operations being mostly shouldered by computer applications and automated programs, these businesses prioritize saving or healing their IT system above all else. Any organization will not argue that they really don’t want to be offline or un-powered for a lengthened duration.

All in all, Disaster Recovery or DR is, without a doubt, not similar BCP because:

1. BCP stands for Business Continuity Planning whereas DR is Disaster Recovery.
2. BCP is a proactive strategy whereas DR is a reactive approach.
3. BCP helps prevent and anticipates a disaster or unfavorable incident in advance whereas DR is a strategy that treats or recovers from disasters and the like.

Hope the above is informative.

Thanks
Logan

Saturday, June 25, 2011

JBOD vs RAID : Storage


On the Introduction of DAG in exchange 2010, the cost involved in the storage disks can have the flexible options. The below blog explains the pros and cons of usage of JBOD vs RAID storage.


Adding to that, the below is the basic difference between the JBOD and RAID Disks.


Hope the above is informative.

Thanks

Logan


Thursday, June 16, 2011

Kaspersky 8 Update Availability – forefront SP2 Rollup

The below are some information for the exchange administrators on up gradation of forefront SP2 rollup3 for getting the Kaspersky engine 8 update.

1. Upgradation is an straight forward process, don’t panic after the up gradation also the engine folder name and in GUI mgt console it shows as kaspersky5 though the engine kaspersky8. As per Microsoft “The Kaspersky engine's names incorporates the version number '5'. Even after installing this hotfix rollup, the engine name for Kaspersky will still be "Kaspersky5" in both logs and within the Forefront Administrator client. This is purely a cosmetic issue and does not affect functionality.” So it’s fine.

2. New Engine updates are quite bigger in size compared to the old engines. So the default scan engine update time needs to be increased in the server through regedit. Also the incremental type of engine download is not available with rollup2, whereas rollup3 does have incremental type engine update

HKLM\SOFTWARE\Wow6432Node\Microsoft\Forefront Server Security\Exchange Server
•Open Regedit
•Navigate to the following key:
HKLM\SOFTWARE\Wow6432Node\Microsoft\Forefront Server Security\Exchange Server
•Click New DWORD Value
•Type EngineDownloadTimeout, and then press ENTER
•Right-click the new value and select Modify
•Select Decimal as the base, enter 600 in the Value data box, and then click OK. This setting causes the scan engine download process to time out after 600 seconds (10 minutes, instead of 5 minutes)
•Exit Regedit

3. On cluster make sure LocalEngineMapping.cab has been copied to the shared resource location else the engine update will fail in the clustered mailbox servers. For other roles, the file will be automatically updated in the correct installation folder itself.

As mentioned in the Microsoft site,

To install the hotfix rollup on a SCC cluster, choose one of the following methods:
Method 1
To install this particular hotfix on a SCC cluster, you should perform upgrades on all active nodes first. Setup will prompt you to allow it to take resources offline and bring them back online automatically. Check that all resources are online, and that all Forefront and Exchange services have been started afterwards. You should manually bring resources online / start services, if necessary. Once you have upgraded the active nodes, do not failover. Finally, upgrade each passive node in turn.
Installing on all active nodes first means that Forefront will be able to access the DatabasePath location, where it needs to copy a file to (LocalEngineMapping.cab).

Method 2
If you prefer not to upgrade on active nodes, you may perform a “rolling upgrade” where you install on each node only when it is in a passive state. This involves performing a series of failovers, so that each node has a chance to become passive. Once all nodes have been upgraded, you must copy LocalEngineMapping.cab from each active node’s local installation to the shared disk folder for the CMS. Forefront needs this file in the following shared disk location, in order to be able to upgrade the Kaspersky engine to version 8.
Copy LocalEngineMapping.cab from each active node’s local installation (source) to its shared disk folder (target):
Source location: \Program Files (x86)\Microsoft Forefront Security\Exchange Server
Target location: \ForefrontCluster\Engines\
Notes:
a. There is no need to restart any services or failover the cluster after you have copied LocalEngineMapping.cab to the shared disk folder.
b. If you do not copy LocalEngineMapping.cab to the shared disk folder, Forefront will continue to try to update version 5 of the Kaspersky engine (which will be retired by Microsoft after 31st January 2011).

4. After the up gradation, if the old obsolete engines are still showing, then try renaming the scandisk.fdb and template.fdb (after stopping the forefront services). On restarting the service rebuild the two files, thereby will get the latest working engines alone.

5. In case of any engine update failure, check progromlog.txt which captures the complete engine update events with timestamp and neat descriptions.

Hope the information is useful.

Thanks
Logan

Wednesday, June 15, 2011

BB device troubleshooting - client side

The below is the basic first level troubleshooting needs to be done in the BB device client side.

1. Check the signal strength.

2. Checking the wireless network connection setting
If the signal is good, there is no need to check the wireless network connection setting, but when the signal is down make sure the wireless network options are set. Check in Menu --> Options --> Mobile network options --> Make sure data services is on (mobile network and network selection mode is set appropriately)

3. Check the availability of the PIN Number in the device. Device --> option --> status --> will find 8 digit alphanumeric PIN Number. If you don’t find the pin number, try to register the device by going to Device --> option --> advanced options --> Host routing table --> press menu key and choose register. This will register your device in the BB RIM and the new unique PIN number will be generated, still if you have the issue in getting the PIN Number, then the problem is with the device and needs to be checked with the vendor.

4. Can check the mail flow from the BB device itself to the same connected user account or can send test PIN message to the same device account.

5. If you're having mail or messaging issues, or any other BlackBerry performance problems, you should resend your device's service books.

6. We can use the Blackberry device manager for synchronizing the BB device with the server i.e., outlook email client.

If the above are fine, then troubleshooting needs to be done at the BES server side like BESAdmin account permission, mailbox quota check, BB device last contact time, BB detailed event logs and goes on. Probably I will document an article on that front in the near future.

Hope the above information is useful.

Thanks
Logan

Blackberry OS Installation/Upgradation:

This article explains the installation/upgradation of the blackberry Smartphones.

1. Connect the device and take the complete backup of the BB device using the Blackberry Desktop Manager and check the backup data for entries of contacts, messages, etc.
2. Disconnect the Device.
3. Download the Blackberry device OS from Blackberry website for the appropriate model and also chose the appropriate provider (exe file).
4. Run downloaded exe file and it gets extract the files in the location (C:\Program Files\Common Files\Research In Motion\Shared\Loader Files) by default.
For example: it creates the folder 8300-v4.5.0.174_P2.7.0.105 for the device 8300 BB device.
5. Select the application loader option in Blackberry Desktop manager and choose the update software | click start.
6. Connect the device and it should detect and the device model will be shown in the drop down menu.
7. Its check the device and gives the list of application and language setting before starting the installation, leave the default value and choose next.
8. Process takes around 30-60 minutes to complete. During the course of installation, it also takes the backup and restore after the OS upgrade.
9. At the end of the successful installation and unplug the device and check for the latest version and data.

Note:
Make sure Blackberry device battery level and also computer power are good before starting the installation.

Thanks
Logan

Monday, March 7, 2011

New features in the unified messaging of Exchange 2010

Hi Friends,

In this article, let’s see the new features in the unified messaging of Exchange 2010.

The following is a list of new Unified Messaging features that have been included in Exchange 2010:

  • Personal auto attendants (call answering rules)
  • Additional language support including in Outlook Voice Access and Voice Mail Preview
  • Enhancements to name lookup from caller ID
  • Voice Mail Preview
  • Messaging Waiting Indicator
  • Missed call and voice mail notifications using text messaging (SMS)
  • Protected Voice Mail
  • Built-in Unified Messaging administrative roles

For more information about the new Unified Messaging functionality and new voice mail features.

Functional Descriptions

Voice Mail Preview: Exchange Server 2010 will facilitate the cumbersome task of navigating through voice messages. With Exchange Server 2010 speech-to-text translation, the user can read the contents of the audio recording in the same fashion they would read an e-mail. Furthermore, if the resulting voice messages are opened using Microsoft Office Outlook 2010, the text of the voice mail preview will become "actionable". Recognized names, contacts, and phone numbers will all be identified with icons that the user can select to add contacts, call using Office Communicator, or send e-mail. To facilitate navigation of the audio, clicking in the text will cause the voice mail to jump to that word and continue playing.

Protected Voice Mail: Exchange Server 2010 solves the problem of unauthorized distribution of the messages by securing the message content, specifying the users who may access that content, and the operations that they may perform on it. It uses Active Directory Rights Management Services to apply Do Not Forward permissions to voice messages that are designated either by the sender (by marking the message as private) or by administrative policy. This prevents the forwarding of protected voice mails in a playable form to unauthorized persons, whatever the mail client used.

Message Waiting Indicator (MWI): Now with Unified Messaging, users are notified of the presence of new/unread voice mail by lighting the lamp and providing a count on their supported desk phone. Additionally, users can configure their text messaging notification account to receive the beginning content of the voice mail preview in the SMS.

Auto Attendant: Users are often looking for a person in an organization, but are unsure of the extension or exact phone information. Exchange Unified Messaging's Auto Attendant enables users to easily navigate to the person they are trying to reach when calling an organization with either the telephone keypad or speech inputs to navigate the menu structure, place a call to a user, or locate a user and then place a call to that user. An auto attendant gives you the ability to:

  1. Create a customizable set of menus for callers
  2. Define informational greetings, business hours greetings, non-business hours greetings, and holiday schedules
  3. Describe how to search the organization's directory and connect to a user's extension
  4. Enable external users to call the operator

Call Answering Rules: Unified Messaging enables users to have more control over their call flows. For a salesman, this could mean the difference between sending an important sales lead to his voice mail instead of finding him on his cell phone or home phone. Call Answering Rules present callers with custom greetings, Find-Me, and call transfer options, in addition to leaving a voice mail. Moreover, these rules can be preceded by conditions (such as caller-IDs, time-of -day and Exchange free/busy status), giving end-users greater control over how they can be reached over the phone.

Outlook Voice Access: Users now have control over their Inbox with Outlook Voice Access via a telephone keypad or voice inputs. This enables anywhere access to their mailbox when a user is away from a computer or Internet-connected device. Now users no longer have need to worry about being late for appointments or being disconnected when traveling, as they can instantly call into their mailbox to manage their calendar, contacts, and e-mail.

Enhanced Caller ID: Users can get more context and information about their callers with Enhanced Caller ID. Callers are often not a part of a user contact list or organization's directory. For these cases, Windows Live Search will be used to try and determine the calling party. If a match is found, the result will be placed on the calling line of the message to better inform the user where the call came from.

Language Support: More users can now listen to and interact with their e-mail and voice mail in their native language or dialect. Exchange Server 2010 offers a broad range of language support with support for 16 languages including three varieties of English, plus Mandarin, Cantonese, European and North American versions of Spanish and French, and several other European languages.

Thanks

Logan

Tuesday, February 1, 2011

Exchange 2010: DAG Features

Hi friends,

It’s been a while since I wrote an article, busy with the office work. Let’s move on. This article gives you what is DAG and its new feature and how it is different from the previous exchange versions.

Database Availability Group is one of the most expected new features of Exchange 2010. Microsoft has invested more time in reviewing the high availability feature of the mailbox resources.

Reason for the DAG:

1. In multisite CCR Cluster solution, the complexity in case of failures are more and especially in site resilience scenarios.
2. Features like CCR, SCC and SCR in exchange 2007 was not designed for the site resilience in the multi-site environment.
3. Hard time for engineers in handling the windows cluster dependent issues in failovers in multisite environment.
So conclusion, Simple and improved method for high availability feature is indeed a must on Exchange 2010.

Features removed from Exchange 2007:

1. No CMS or EVS concept or switches
2. No Storage group.
3. Limitation on having only Clustered Mailbox sever role without any other roles installed.
4. Exchange database is no more with the server level instead moved to Organization level.
5. No need to choose for installation of clusters or non-clustered mailbox at the start, can be done after deploying the server role (can call us incremental feature for deploying).
6. No LCR, SCC, SCR, CCR (but still there is trace of SCR and CCR patterns).

Features retained from Exchange 2007:

1. Uses Enterprise edition for DAG, since it uses limited part of Windows Failover Clustering.
2. Concept of seeding between the storage group copy with the queue length, replay time, etc. are retained in DAG as well.

New features of DAG:

1. They combined the SCR + CCR and derived a framework for high availability called DAG, which will be used for all deployment scenario - local or site or disaster cases.
2. Active Manager is the brain behind the switching/failovers. It is the replacement for the Exres.dll (Exchange Cluster resource DLL) of exchange 2007. There are two components for active manager, one called PAM – Primary Active Manager which decides on the active or passive copies and the other one called SAM – Standby Active manager which detects the failover and inform the PAM to initiate the failover.
3. Incremental Deployment i.e., forming cluster prior installing the exchange 2010 is not necessary anymore.
4. Database has been changed to the organization level from the Server level.
5. Limited dependency on Windows Failover Clustering – no more exchange application related entity are carried by the windows cluster instead you will have the limited dependency of Cluster database, heartbeat and the file share witness.
6. Co-existence with other Exchange roles since Exchange 2007 Clustered mailbox doesn’t work along with any other server roles.
7. Switch/Fail-overs much quicker than in the past.
8. Backup-less: No need to have the extensive backups/backup strategy of mailbox DB of more than 3 copies.
9. Support for DAG members in separate AD sites – member of DAG can be in different AD sites, but of Course should be of same domain within the forest.
10. Change in Log shipping: instead of SMB (Server Message Block) for shipping the log files, it uses the TCP protocol.
11. Availability of Log file Encryption and Log file compression.
12. Support for Public folder database is not supported in DAG instead it uses traditional Public folder replication mechanisms.
13. Truncation lag time value in Exchange 2007 SCR has been changed from 7 days to 14 days in Exchange 2010 DAG.

Hope the above is informative.

Thanks
Logan

Sunday, September 12, 2010

"Here you have" worm mail

Hi friends

"Here you have" worm mails after a decade.. Soon we can expect the update in one of the engine of the Microsoft forefront for exchange.

Can be blocked by putting a rule in the edge server/hub transport using the content filter or by transport rule..
FYI


Thanks
Logan

Saturday, July 10, 2010

SCCM Client : Reassign Sitecode

Hi Friends,

The below is the script which can be used to assign the sitecode for the SCCM Client PC remotely. There will be a scenario of changing the sitecode in the client computers after implementation of new SCCM server with different sitecode, or may be moving all the users from the earlier SMS to SCCM2007 environment of different sitecode. In this case, we can make use of the below VBScript to change the sitecode in the configuration client (SCCM Client) in all the clients remotely. The below scripts can be deployed using the GPO via Logon Script or using the remote execution of the scripts or even use remote script execution tools. The permission for the execution of the script in the client PC is obvious, for better practice can make use of the same SCCM admin account, which in turn will have the appropriate permission for the script execution.

#######

'replace with your Site Code
sSiteCode = "NEWSITECODE"
sMachine = "."
set oCCMNamespace = GetObject("winmgmts://" & sMachine & "/root/ccm")
Set oInstance = oCCMNamespace.Get("SMS_Client")
set oParams = oInstance.Methods_("SetAssignedSite").inParameters.SpawnInstance_()
oParams.sSiteCode = sSiteCode
oCCMNamespace.ExecMethod "SMS_Client", "SetAssignedSite", oParams

#######

Save the above file with the extension .vbs and replace "NEWSITECODE" with your sitecode accordingly.

Thanks

Logan
logu_microsoft@hotmail.com


Backup and Recovery

This article gives information about backing up the Blackberry data and also restoration. As we know the BES and exchange are tightly integrated, the real email data’s are stored in the email servers only. In BES server level, the following needs to be backed up
* BES Database of SQL 2005 i.e., BESMgmt Database
* BES User details and Configuration details.

1. BES Database Backup and Restore:
For Blackberry, as we know the database is hosted in the SQL Server. Henceforth can make use of the backup and restore option in the SQL Server itself.
Open the backup console from the SQL 2005 studio express console,
• Go to the concern Database in the console -- right click and select Task -- Backup
• Enter the backup file name and location in the general window.
• Select the options for media writing as required to complete the backup in the option window.
For the restoration same process, select the restore option from the console.
• Select the destination of the latest backup file in the General window.
• Select the appropriate write option to complete the restoration in the option window.

2. Blackberry User Information Backup and restore
The BB user details and Configuration details can be backed up by using the built-in tool called BlackberryBackup.exe. The below is the location of the file,
C:\Program Files\Research In Motion\BlackBerry Enterprise Server\Utility
Note : Here C:\ is the source installed drive.
Backup
### To take the backup of the user information
BlackBerryBackup.exe -b -o C:\BB_Bkp\bb_user.txt -n dxb-bbs-01
### To take the backup of the BES configuration information
BlackBerryBackup.exe -r -o C:\BB_Bkp\bes_conf.txt -n dxb-bbs-01
Note:
-b –o -- Backup (-b) of BB user details to the output file (-o) C:\BB_Bkp\bb_user.txt
-n -- Blackberry servername
-r –o -- Backup (-r) of BB configuration details to the output file (-o) C:\BB_Bkp\bb_conf.txt
Restore
### To restore the user information from the file using the option "-i"
BlackBerryBackup.exe -b -i C:\BB_Bkp\bb_user.txt -n dxb-bbs-01
### To restore the configuration information from the file using the option "-i"
BlackBerryBackup.exe -r -i C:\BB_Bkp\bes_conf.txt -n dxb-bbs-01
Note:
-b –i -- Restore (-b) the BB user details from the input file (-i) C:\BB_Bkp\bb_user.txt
-n -- Blackberry servername
-r –i -- Restore (-r) the BB configuration details from the input file (-i) C:\BB_Bkp\bb_conf.txt

Thanks
Logan
Logu_microsoft@hotmail.com

Blackberry Enterprise Server Deployment

This article gives you the deployment steps for the Blackberry Enterprise Server in the Exchange Server Environment. Before deploying the BES Server, we need make sure some pre requisite tasks. I have considered Blackberry Enterprise Server 4.2 application and SQL 2005 Std for this article.

1. Existence of functioning exchange 2007 Env and BESadmin Account
Before deploying the BES application, the functioning exchange 2007 is obvious.

1.1 Creation of BB admin account called BESadmin
1. On the computer that hosts Microsoft Exchange, log in as an administrator with the permission to create an account.
2. Open the Microsoft Exchange Management Console.
3. Create a Microsoft Exchange account that is named BESadmin.

1.2 BB Computer Account Permission on BESadmin
On each computer that you plan to install the BlackBerry® Enterprise Server or the BlackBerry Manager on, you must configure the Local Security Policy permissions for the Microsoft® Exchange account that you plan to use to complete the installation.
Without the proper permissions, the BlackBerry Enterprise Server cannot function.
1. Right-click My Computer – Planned BES Server Eg dxb-bbs-01.
2. Click Manage.
3. In the left pane, expand Local Users and Groups.
4. Navigate to the Groups folder.
5. In the right pane, double-click Administrators.
6. Click Add.
7. In the Enter the object names to select field, type BESadmin.
8. Click OK.
9. Click Apply.
10. Click OK.

1.3 BESadmin Account permission on Exchange
Configure Microsoft Exchange 2007 permissions for the Microsoft Exchange account
1. On a computer that hosts the Microsoft® Exchange Management Shell, open the Microsoft Exchange Management Shell.
2. Perform one of the following actions:
• If you are performing the command locally on the Microsoft Exchange 2007 server, type: addexchangeadministrator
"BESAdmin" –role ViewOnlyAdmin
• If you are performing the command from another computer, type: get-mailboxserver
"" | add-exchangeadministrator "BESAdmin" –role ViewOnlyAdmin
3. Type the following command:
get-mailboxserver " " | add-adpermission –user "BESAdmin" –accessrights ExtendedRight –extendedrights Send-As, Receive-As, ms-Exch-Store-Admin

1.4 BB Device Users permission for sending message in exchange
Enable BlackBerry device users to send messages in a Microsoft Exchange 2007 environment. In this case, we are giving the BESadmin account the sendas permission to the domain root, so that all the BB enabled in turn will be able to send message from their BB enabled device.

1. On any computer within your organization's domain, on the taskbar, click Start > Administrative Tools > Active Directory Users and Computers.
2. In the View menu, click Advanced Features.
3. Right-click the domain root.
4. Click Properties.
5. On the Security tab, click Advanced.
6. Click Add.
7. Type BESadmin.
8. Click Check Name.
9. Click OK.
10. In the Apply Onto drop-down list, click User Objects.
11. In the Allow column, select the Send As check box.
12. Click Apply.
13. Click OK.

2. Installing the SQL 2005 for BB Database
• Install the SQL server 2005 with default instance and enter the information of service account which is created for BB management (BESAdmin) while installing the SQL and install the SQL with windows authentication. Apply the latest service pack after the installation for SQL.
• Select all the components and also select the Default Instance for the SQL installation.
• Enter the information of service account created for BB(BESAdmin) for SQL service.
• On Authentication Page, Use the windows authentication mode
• Click Next in all the screens as per the default options and click Install to complete the SQL server installation.

3. BES Installation
Before starting the BES server installation, make sure the below are available with the diskette.

• client access license key
• SRP identifier
• SRP key
• SRP host

1. Click the Setup.exe
2. Enter the Appropriate name and organization, select the region.
3. Accept the license agreement.
4. Select the setup type; choose Blackberry Enterprise Server option which in turn will install all the components like MDS, Router, attachment Service, etc.
5. Accept the apache license agreement page also.
6. Pre install checklist screen.
7. Enter the BB service account name – BESadmin and password. Choose the installation folder and log file folder accordingly.
8. Installation summary and next.
9. Select Continue
10. Press yes to reboot the server and after restarting login as BESadmin and the installation window will start automatically.
11. Database integration part, leave the default values and press next
12. Enter the CAL Key and press next.
13. Enter the SRP Address srp.ae.blackberry.net and use test connection.
14. Enter the SRP info (Damac SRP details)
15. SRP Identifier
16. SRP Authentication Key
17. Leave the host routing information empty.
18. Click Validate SRP key and ID, the window pops up with the exchange server details. Enter the Exchange server name and user name BESadmin.
19. On WAN SRP setting, leave default value and press next.
20. Messaging part, leave the default.
21. Leave the default and press next for the proxy settings.
22. Check the start service option and click “start service” button.
23. It will start all the BB related services and hence the end of the installation process finish.

4. Post Installation Check
4.1 Check the installation logs
Check the installation setup logs in the below location
C:\Program Files\Research In Motion\BlackBerry Enterprise Server\Installer

4.2 Check the MDS connection
Check the MDS connection as below in the server,
Open the explorer – http://localservername:8080 , which opens the Blackberry Mobile Data Service Connection Service Page.

4.3 Checking the Blackberry Server Components
Go to Control panel --> Blackberry Server Configuration, will have all the components details like router, attachment Server, SRP details. In this case, we have installed all in the same server and hence forth it has set all the values by default, no need to change any values.

4.4 Check the Blackberry Manager Console,
Check the console in the program list in the start menu.

4.5 User creation and Mailflow with BB device
Finally, try creating the user profile in the blackberry Manager and check the mailflow with the device.

Thanks
Logan
Logu_microsoft@hotmail.com

Saturday, July 3, 2010

SCOM 2007 Deployment

SCOM – System Center Operation Manager 2007 which is the successor of the MOM – Microsoft Operation Manager 2005, which is used for monitoring the Server, clients in the windows active directory environment. SCOM 2007 can be used for monitoring not only server and clients in the active directory which also includes network devices and other application like Exchange, SQL, ISA, etc. by the means of corresponding available Management Packs shortly called as MP. Deployment of SCOM 2007 is quote an easy task, this article focus on this.

1.Planning:
• Selecting the OS either 2003 or 2008.
• Selection of 32 bit or 64 bit processor (it is important that if you choose the 64 bit and the reliable database package like SQL 2005 must be in 64 bit due to the factor operational database compatibility).
• Operational installation account in AD e.g., ScomAdmin (make password never expires) and related permissions.
• Check the forest and domain functional levels.

2.Pre requisite:
Since the installation first page has the prerequisite option, on clicking that will give you the availability status. Still, the below are the items which needs to be installed before deploying SCOM 2007.

• IIS 6.0 and above (IIS 7.0 needs to select some additional features like iis 6.0 compatibility, basic authentication and few. So better side can select all the features and install )
• SQL 2005 SP2 and above (SQL 2005 SP1 or express version does work for SCOM 2007) and use the ScomAdmin account during the installation of the default instance of SQL.
• Dot Net framework 2.0 with SP2 and above (Dot net framework 3 is better)
• ASP.NET 2.0 and ASP.NET AJAX Extension 1.0
• Using the tool MOMADAdmin.exe tool create a container for operation manager in AD

MOMAdAdmin.exe {Management Group Name} {Ops Mgr admin Group} {Ops Mgr account} {Domain name}

Eg.,

MOMADAdmin.exe OpsMgr ScomAdminGroup ScomAdmin Logan.com

3.SetupOM.exe
Login with the SCOM admin account (SCOM operational account that we created in the AD and also we used the same account during the installation of the SQL as well)

• Select Install operation manager 2007 to start the wizard
• Accept the end license and enter the license key.
• Installation type – choose custom type and select all the components, make sure all components and sun components are selected for installing on the local disk drive.
• Management Group Name : Enter “OpsMgr” (something meaningful and which cannot be changed later)
• User account selection: select ScomAdmin from the AD.
• Database Instance and port (1433) – leave the default values.
• Database and log file option – leave the default values
• Select the Data file and log file location.
• Management Server Action Account: accept the default domain or local account.
• Enter the SDK and Config Service account either domain or local account.(Can use ScomAdmin also)
• On the web console, choose the Windows Authentication
• Microsoft Error reporting option, choose ‘No’ option.
• Customer experience improvement program option.
• Click Install option to start the installation.
• On the end, it will ask for the Encryption key for Backup and restore option (optional).

Thanks

Logan

Logu_microsoft@hotmail.com

Tuesday, May 4, 2010

New Features in Windows server 2008:

Hi Friends,

Getting busy on testing out some appl like SCCM 2007 and SCOM made me to stay away from blogging, so thought of writing one.

It’s been quite a time for windows server 2003, people already started using windows server 2008 and are happy with the new features available. This article gives you the new features available in Windows server 2008.

1. Role based installation

Windows server 2008 has quite number of roles in the server manager, which can be installed as when required. The below are the roles,

Active Directory Certificate Services

Active Directory Domain Services

Active Directory Federation Services

Active Directory Lightweight Directory Services

Active Directory Rights Management Services

Application Server

DHCP Server

DNS Server

Fax Server

File Services

Hyper-V

Network Policy and Access Services

Print and Document Services

Remote Desktop Services

Web Services (IIS)

Windows Deployment Services

Windows Server Update Services (WSUS)

In the above some of them are new features, which I will discuss later. Also some of the above features are specific to certain edition of the windows server 2008. Please check out http://www.microsoft.com/windowsserver2008/en/us/r2-compare-roles.aspx

2. Server core

One of the expected feature and most welcomed feature which going to drive Microsoft server OS forward is the server core feature. Like UNIX server environment, you can have the server core shell windows alone, no need of having GUI with fancy GUI drivers. But the optional GUI option also available. The trend of having the single shell for server operation in a Microsoft was a dream for most of the system administrator. This server core installation option allows us to install specific server role like DHCP or Print server. So all server operation can be done sufficiently in command prompt, no more GUI specific configuration stuffs required unlike previous versions.

3. Virtualization – Hyper V

Virtualization enables you to have multiple logical servers in a single server provided with all functionality like networking, dedicated memory, high performance, etc. Since virtualization as a technology is a revelation in IT because of its cost reduction. Already we have application like VMWARE and virtual PC making ways. Hyper V along with the server OS is definitely good. Just to make it interest, please check out the below link

http://www.milesconsultingcorp.com/Hyper-V-versus-VMware-Comparison.ASPX to find the comparison between the VMWARE and Hyper V.

4. Powershell

Powershell was as expected one. Since Powershell started making news from the release of the exchange 2007. The entire administrative task can be done with ease using the Powershell, which makes the system administrator life easier. Powershell has the built-in active directory related cmdlets which can be effectively used for multiple purposes.

5. Right Management Services

Data security has been taken to the next level by means of this service. We don’t have answers for the security on documents which the end users who have the access or the mails which have the sensitive information can be forwarded to anyone outside the organization. This service helps in preventing the above scenarios. Since it is integrated with the active directory helps in providing security for file level and also emails.

6. RODC – Read Only Domain Controllers

It is one of the new features which have excellent features in terms of both functionality and design. It provides solution for the scenario like most of the branch offices DC server lacks the quality administration, henceforth chance are there for poisoning the Home DC by replicating the faulty data’s. This RODC only acts as a Read only DC; it won’t be chance to write any data and resulting in no need of sending any update to the main office. So it is unidirectional update i.e., only from normal DC to RODC. RODC do wonders for multi-site work environment.

7. IIS 7.0

IIS 7.0 has been improved mainly in terms of security when compared to the IIS 6.0. I don’t know much about this application interiors, I leave it to you people to check out the new features from the link http://learn.iis.net/page.aspx/110/changes-between-iis-60-and-iis-7-security/ . These improvements are with respect to Authentication, Authorization, SSL, Web Service Extension Restriction List and IP restrictions.

8. Enhanced Terminal Services – Remote desktop Services

The former terminal service has been renamed to Remote desktop Services and which has been significantly improved. The features are the following.

RemoteApp – Server based remote application programs can be accessed in the local computer using the terminal services, which looks like normal execution of the local application.

Web Access – Using this they will be able to access the remote app programs through internet via browser.

Gateway – Using this feature the user will be able to take the remote connection from the outside LAN i.e., from public provided the TS gateway is configured.

9. Network access protection

Network access protection is the new features which mainly related the security. This policy enables us to have the control over the connection to domain network based upon some threshold compliance, in case of any systems which are sort of the threshold compliance; it will force the missing compliance and then allow the host to connect it to the LAN. For e.g., we have the deployed some security patches for all the users, one of the user who is not part of this activity came after a long vacation. There is a chance for some security lapse; here comes the role of NAP to enforce the missing one.

10. Group Policy Management Improvements.

Group Policy Management has many improvements in account policies, password policies, etc. We have special query option in the GPMC console in order to list out the policies which are set or also no need to search for a particular policy in the hierarchy can be easily searched with the namespace.

11. Windows Deployment Services:

Using this deployment services we can even able to deploy the OS. In previous version, this option was not available and also it can be achieved by application like SCCM. Windows Deployment service use the TFTP protocol and makes it comparatively faster. Moreover it has the option for Autocast or schedulecast deployment.

The above are main new features which come to my mind; Security of the Server OS is definitely improved much when compared to the earlier versions.

Hope the above information is useful.

Thanks

Logan

Logu_microsoft@hotmail.com

Friday, January 29, 2010

New features Available in Exchange Server 2007 SP2:

Hi friends,
We all know the release of the Exchange 2007 SP2, making news around the corner. The below is the brief information about the new features that are avaiable with the SP2.

1. VSS Enabled plug-in supports exchange aware backups. WSBExchange.exe is the core plug-in file which gets installed while installing SP2. This feature is only available for exchange 2007 hosted in windows server 2008, since windows server backup feature is not available in the windows server 2003. Though it has some limitations when compared to the third party exchange aware backup application like veritas,etc. For further details check,


2. Enhanced Auditing options available. Using this we can have the granular auditing reports like folder access, message access in a mailbox, etc.

3. Improvement/change in the Schema Update. New Dynamic schema update method has been introduced in SP2, which will check for the conflicts when adding a new property to the schema which in turn will avoid the future conflicts.

4. Public folder quota management is the new improvement. Set-publicfolder is the cmdlet for this particular function.

5. Apart from the above, there are bunch of new cmdlets comes along SP2,

Add-AvailabilityAddressSpace
Export-Mailbox
Import-Mailbox
Move-Mailbox
New-ActiveSyncVirtualDirectory
New-ManagedFolder
Restore-Mailbox
Set-ActiveSyncVirtualDirectory
Set-CASMailbox
Set-IMAPSettings
Set-OABVirtualDirectory
Set-OrganizationConfig
Set-POPSettings
Set-PublicFolder
Set-TransportConfig
Test-ActiveSyncConnectivity
Test-OwaConnectivity
Test-WebServicesConnectivity

In the above, some of the cmdlets seems like they are already present before, but which were improved or changed for better purposes in SP2. For eg, in import-mailbox cmdlet is not working as expected when we try for importing mails on particular date basis for large mailboxes.

6. The above mentioned are only the new features, SP2 contains all the bugs fix code which we all rolled out as a Roll ups.

Hope the above info is useful.

Thanks

Logan
Logu_microsoft@hotmail.com | 971-552596187

Sunday, December 27, 2009

Online Move Mailbox feature in Exchange server 2010:

This article explains the Online Move Mailbox feature in the exchange server 2010. In the previous version of exchange, during the course of the mailbox movement, the resultant mailbox user cannot access his email. The downtime during the course of mailbox movement is still an area which needs an attention from the providers, Microsoft has rightly addressed this effectively by bringing in the new feature called Online Move Mailbox feature. By means of this, user mailbox can be moved between databases without affecting the online users. So users will be able to send and receive emails as normal on the course of the movement. This functionality has been named as ”MoveRequest” in exchange 2010.

In the exchange mixed mode environment, the MoveRequest works fine (i.e., the move is online) when you are trying to move mailbox from exchange 2007 to 2010 in transition phase. But unfortunately vice versa i.e., mailbox movement from 2010 to 2007 or 2010 to 2003, the move is offline.

Hope the above is informative.

Thanks

Logan
971552596187 | logu_microsoft@hotmail.com

Script for Event log backup and clearing:

The below is the simple script for backing up and clearing the event logs.

###########################################################################################
strComputer = "."
Set objWMIService = GetObject("winmgmts:" _
& "{impersonationLevel=impersonate, (Backup, Security)}!\\" _
& strComputer & "\root\cimv2")
Set colLogFiles = objWMIService.ExecQuery _
("Select * from Win32_NTEventLogFile where LogFileName='Security'")
For Each objLogfile in colLogFiles
OutputFile = "c:\eventlog\" & "Security "
OutputFile = OutputFile & Day(Now) & "-" & month(now) & "-" & year(now)
OutputFile = OutputFile & ".evt"
errBackupLog = objLogFile.BackupEventLog(OutputFile)
If errBackupLog = 0 Or errBackupLog = 183 Then
objLogFile.ClearEventLog()
Else
Wscript.Echo "The Security event log could not be backed up."
End If
Next
###########################################################################################

In the above, you can specify the log file type accordingly and also specify the location where the event log .evt file will be stored. After taking the backup of the event log, it will clear the event log.

Thanks

Logan

971552596187 | logu_microsoft@hotmail.com

Post Step after Exchange server 2010/2007 and Make it Live:

This article explains the post check steps that need to be carried after installation of internal exchange server for sending and receiving emails from internet. In other words, we are actually making the exchange server into the production world.

After the installation of all mandatory roles of exchange servers and if edge exist then after the synchronization of the edge server with the Hub transport server role, and of course after checking the internal mail flow, we need to perform the below steps to be carried out in the organizational level to make the external mail flow.

1. License Key feed.
2. Accepted Domain setting.
3. Configure Email address policy.
4. Configure a Send Connector to send email to the Internet.
5. In case if Edge server name is not used, then configure the hub transport to accept anonymous SMTP. By default, this option is not set.
6. Configure external certificate for the CAS server for public access.
7. Configure the CAS server according to your organization. The options like Outlook anywhere, Exchange Active sync, Outlook Web access - OWA (2010 called as Outlook Web app)

Thanks

Logan

971552596187 | logu_microsoft@hotmail.com